Connect your DApp with wallets on Sui
When do we consider a web application a DApp? It's when the web app leverages smart contracts to provide services for users. Wallet plays an important role in this interaction where it connects users with DApps. So before you start to build something amazing, you need to connect your dapp with wallets.
Suiet Wallet Kit is an all-in-one wallet connection toolkit that follows the wallet standard of Sui for DApps. With out-of-the-box UI components and well-defined utility functions, you can easily empower your dapp with the ability to interact with wallets in an elegant way.
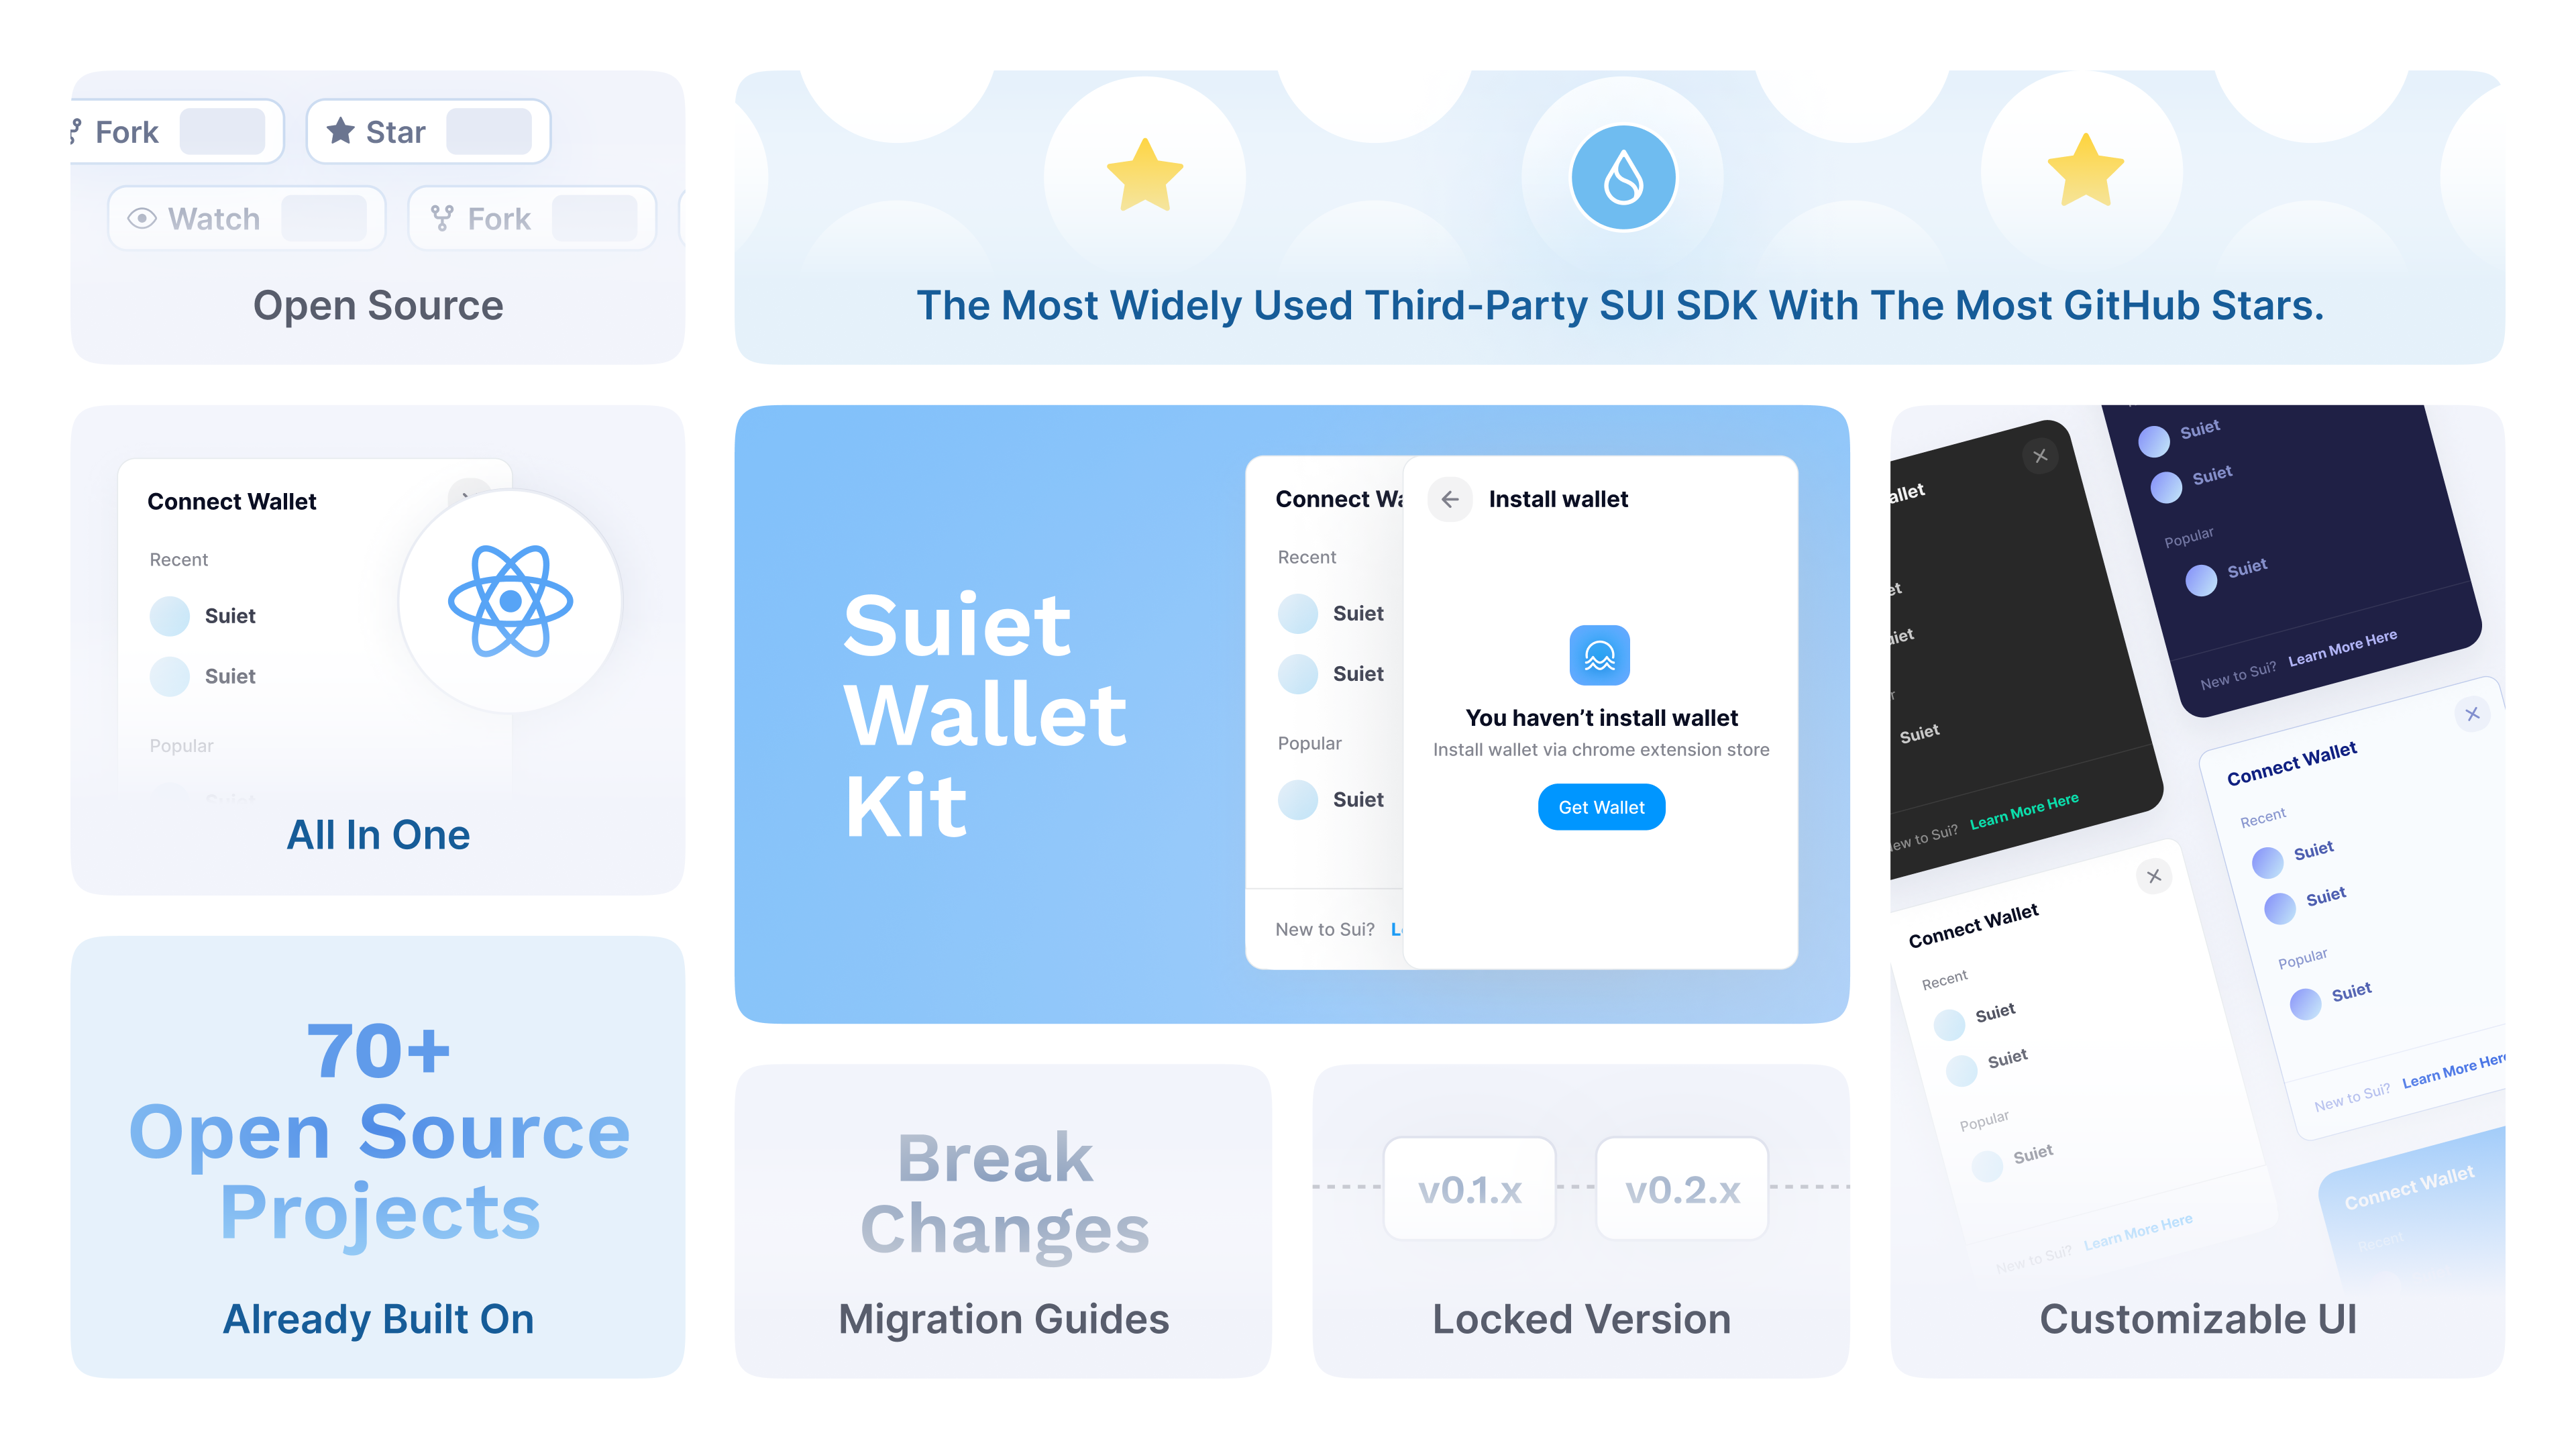
In this tutorial, I want to show you how easy it could be to connect your dapp with all the wallets in the Sui ecosystem using Suiet Wallet Kit.
Tips: Suiet wallet kit only supports React.js projects for now.
Learning Highlights
- Install and configure Suiet Wallet Kit for a React-based DApp
- Connect the DApp with all the wallets on Sui
- Use wallet capabilities (display wallet status and account info, send transactions etc)
Getting started
In this section, I am going to walk you through the installation and configuration for Suiet wallet kit.
Installation
Suiet Wallet Kit is a decent wrapper for the official Typescript SDK @mysten/sui , which handles all the tedious details of wallet connection for you. Therefore, we need to install @mysten/sui along with the kit @suiet/wallet-kit.
For simplicity, we choose npm as the package manager, feel free to change to any alternatives.
npm install @mysten/sui @suiet/wallet-kit
Setup WalletProvider for the App
Next, let's import the WalletProvider and setup for your react project such that your App becomes available to access the states and functions provided by Suiet Wallet Kit.
// src/index.js
import { StrictMode } from "react";
import { createRoot } from "react-dom/client";
import { WalletProvider } from "@suiet/wallet-kit";

import App from "./App";

const rootElement = document.getElementById("root");
const root = createRoot(rootElement);

// wrap your app with WalletProvider
root.render(
  <StrictMode>
    <WalletProvider>
      <App />
    </WalletProvider>
  </StrictMode>
);
Place ConnectButton
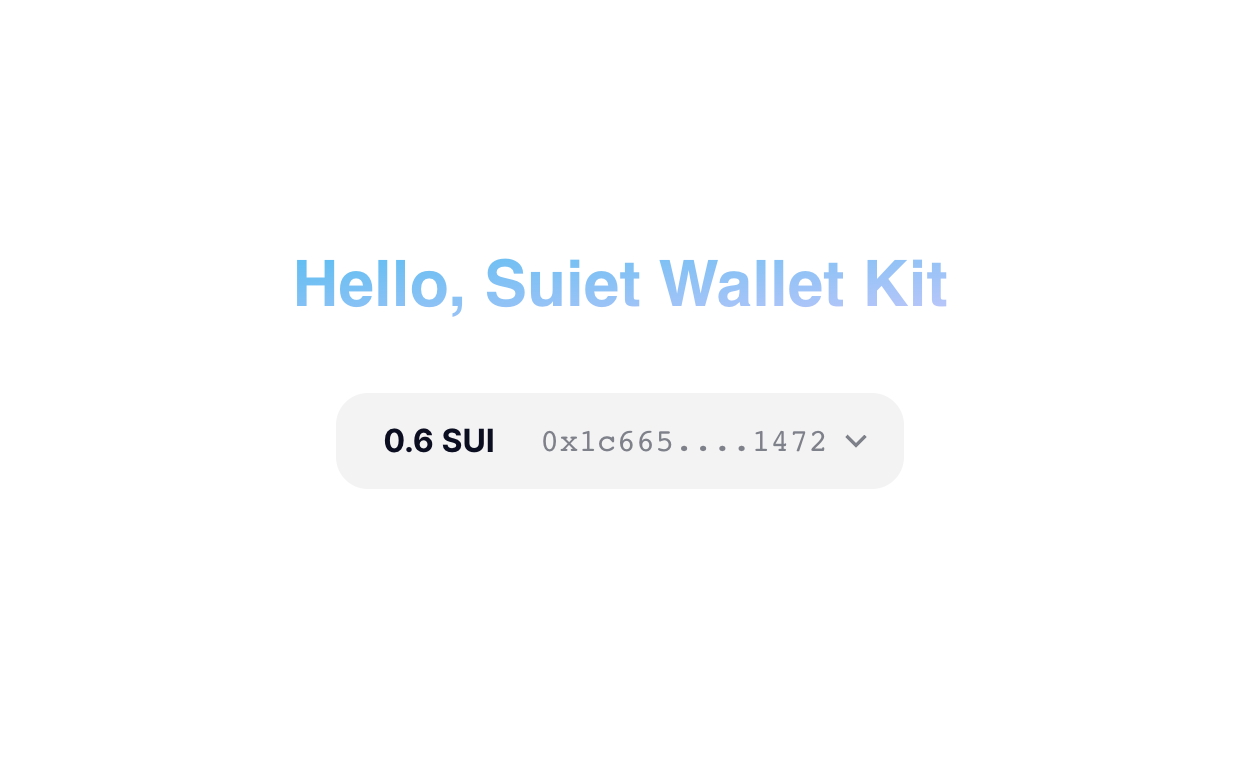
In Suiet Wallet Kit, we provide out-of-the-box UI components in good designs. What you need to do is just import and place the ConnectButton to wherever you like.
Here the example is just for showcasing the UI. Note that the web page generated by codesandbox cannot detect any installed wallet because it is a sandbox that chrome extensions cannot communicate with. I would suggest everybody creates the react project in your local environment.
Connect to all the wallets on Sui
After the preparation above, we are ready to connect to wallets. Suiet wallet kit provides a list of the most popular wallets in the Sui ecosystem. Users can choose their favorite one at their wish.
When we click the Connect Button, it would provide a list of preset wallets for users to choose.
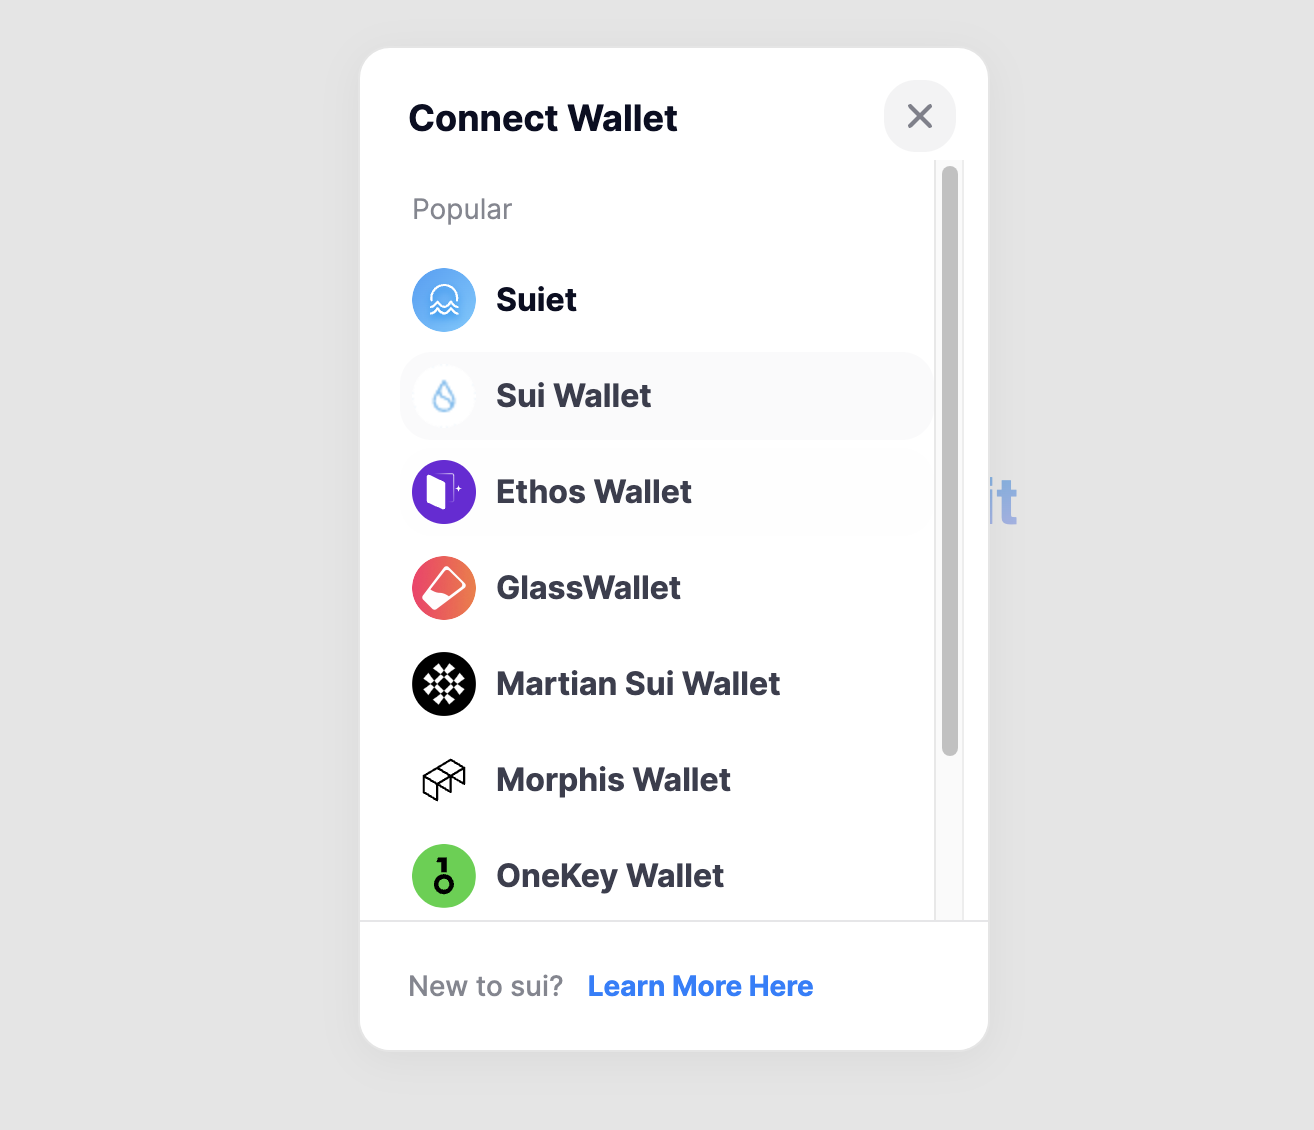
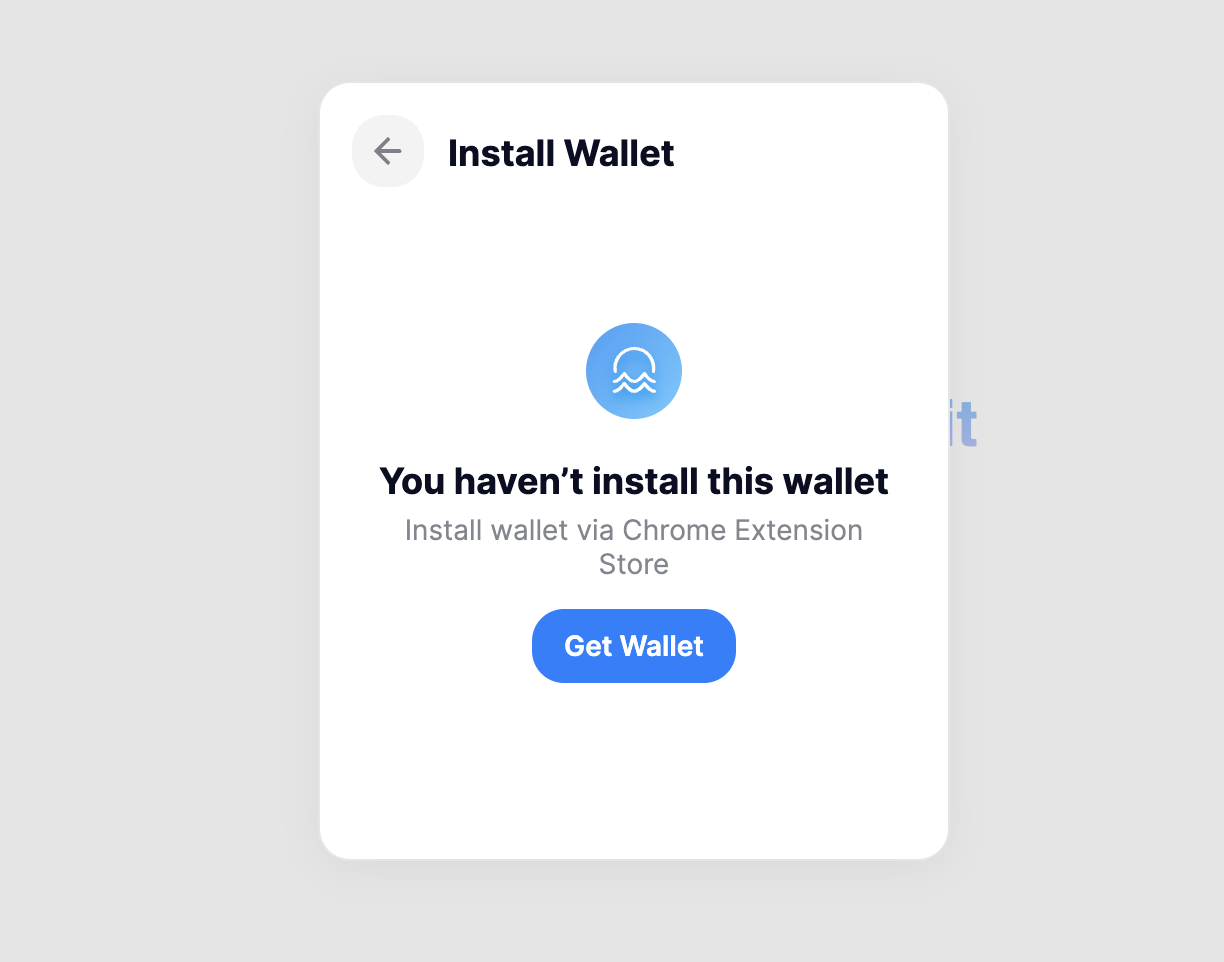
Meanwhile, Suiet wallet kit would automatically detect all the installed wallets that implement the Sui wallet standard in the browser. So If the wallet is not installed, the kit would guide users to download it from Chrome Extension Store. Take Suiet wallet as an example:
Let's move on. Now that the Suiet wallet has been installed, the kit would initiate a connection request to the wallet extension.
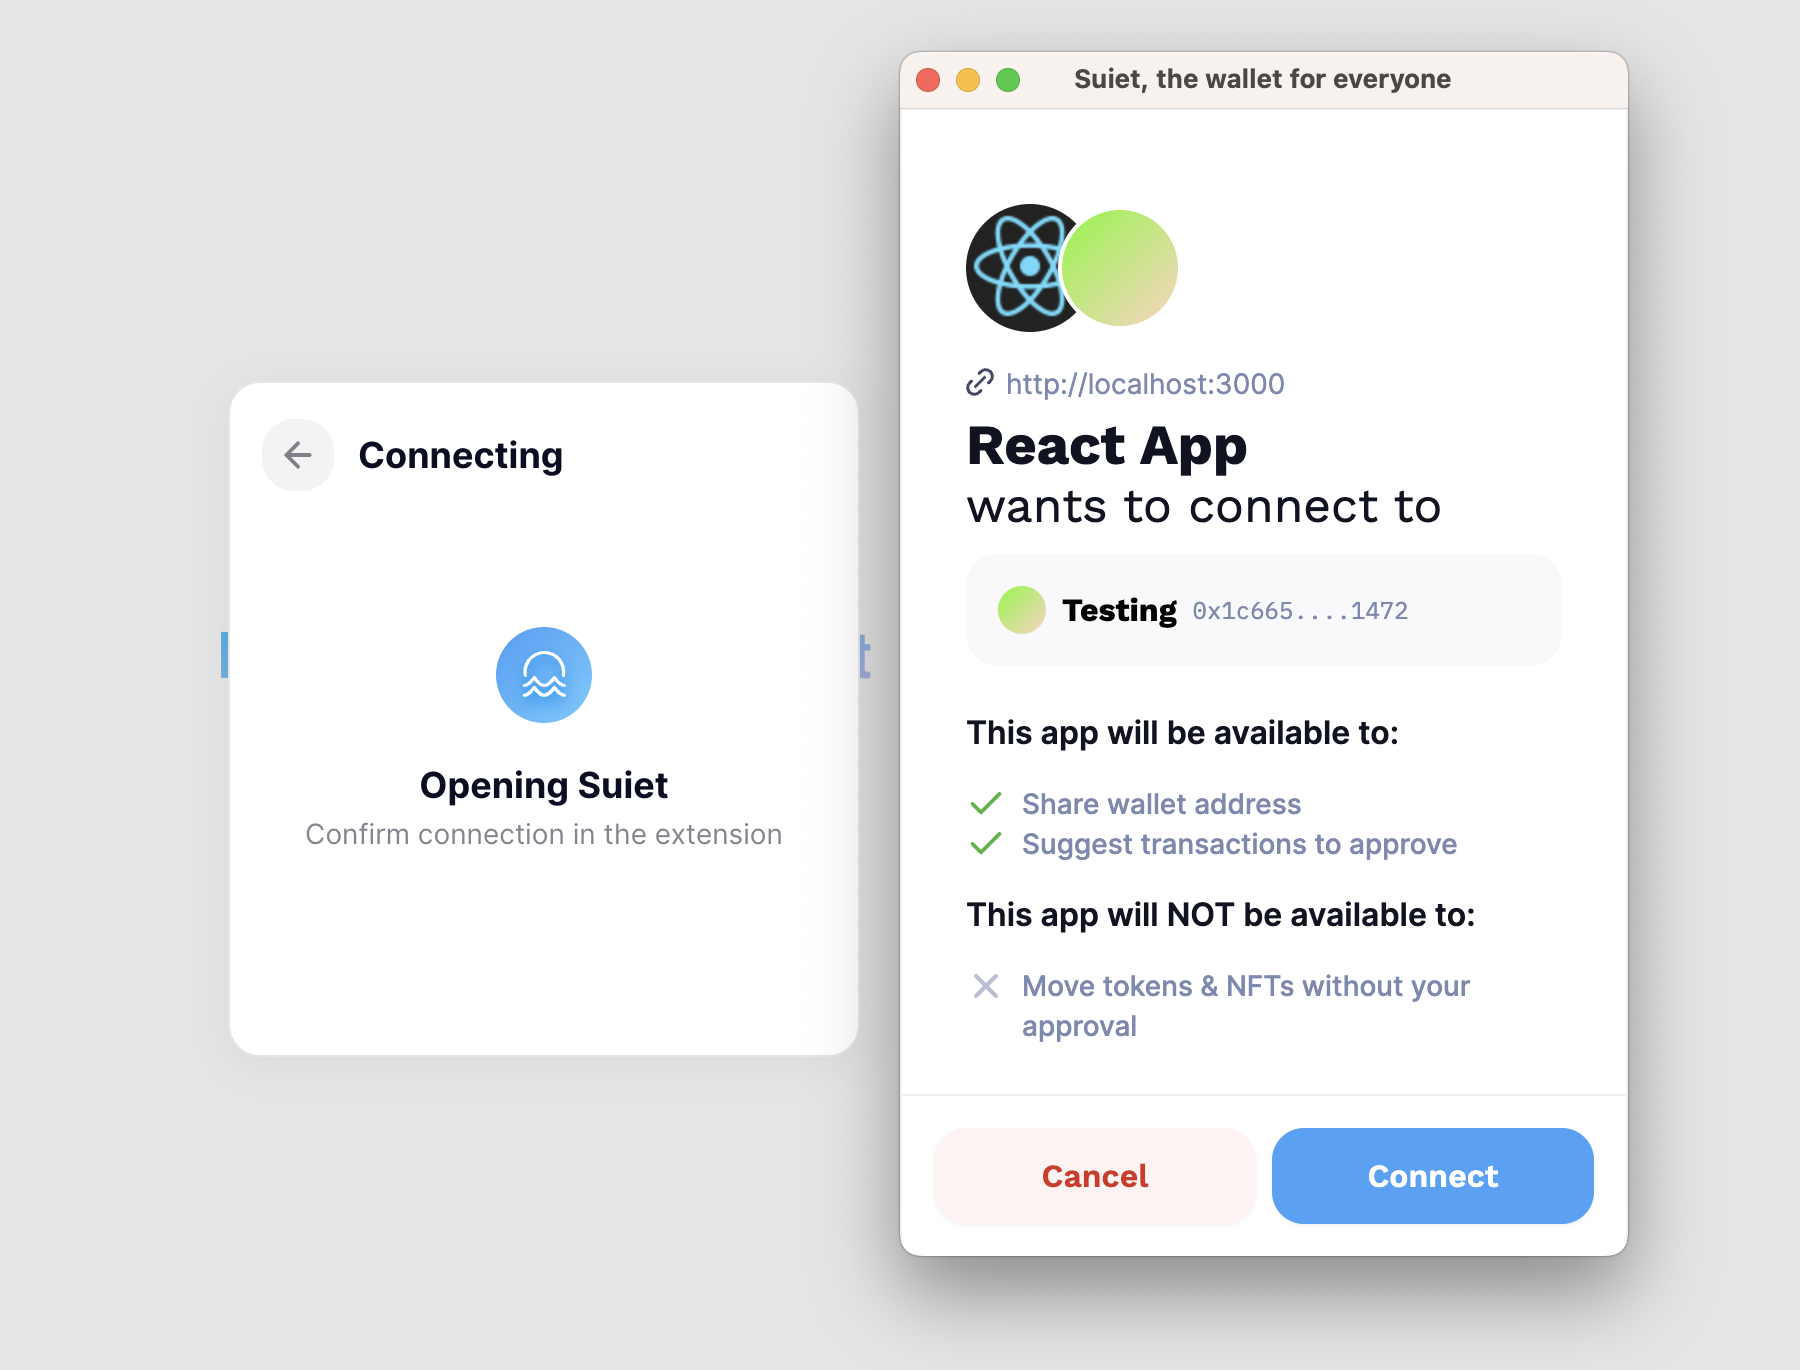
Once user approves the request, the connection would be completed, which means we've successfully connected to a wallet!
Use wallet capabilities
It's time to take a look at the most useful hook useWallet. It retrieves all the properties and functions from WalletProvider, with which you can make use of the account properties and call functions to a connected wallet.
In the following sections, I will show you some basic usages with the hook useWallet.
Display info of the connected wallet
We can get several useful information from the connected wallet via Suiet wallet kit:
- The wallet connection status
- The account info
- The current chain (network) that the wallet is using
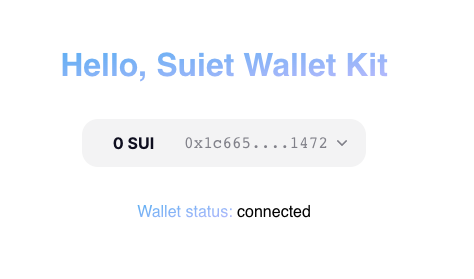
Firstly let's display the connection status for the debugging purpose.
import {
  ConnectButton,
  useWallet,
  addressEllipsis,
} from "@suiet/wallet-kit";

export default function App() {
  // Get access to the connected wallet
  const wallet = useWallet();

  return (
    <div className="App">
      <h1 className="title">Hello, Suiet Wallet Kit</h1>
      <ConnectButton />

            <section>
        <p>
          <span class="gradient">Wallet status:</span> {wallet.status}
        </p>
      </section>
    </div>
  );
}
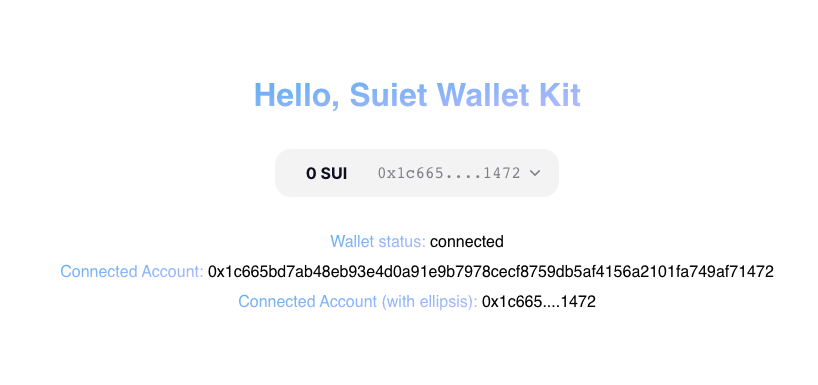
For account info, we usually cares about the address of an account (it's like an ID in the blockchain world!). With the address of the user account, your dapp can get started to a series of work, such as querying user on-chain assets, initiating a transaction request etc. But let's start from the simplest thing: displaying the address of the account on the page.
export default function App() {
  const wallet = useWallet();

  return (
    <div className="App">
      // ...
      {wallet?.account && (
        <div>
          <p>Connected Account: {addressEllipsis(wallet.account.address)}</p>
        </div>
      )}
            // ...
    </div>
  );
}
Note that the address of a Sui account is a 64-character hex string, but usually we only need to display the first and last a few characters, so that is where the util function addressEllipsis comes to play.
Lastly, we need to know which chain that the wallet is using, that is important if we want to make interactions with the correct environment of Sui blockchain. Let's type in these codes:
export default function App() {
  const wallet = useWallet();

  return (
    <div className="App">
      // ...
      <p>
        <span class="gradient">Current chain of wallet: </span>
        {wallet.chain.name}
      </p>
            // ...
    </div>
  );
}
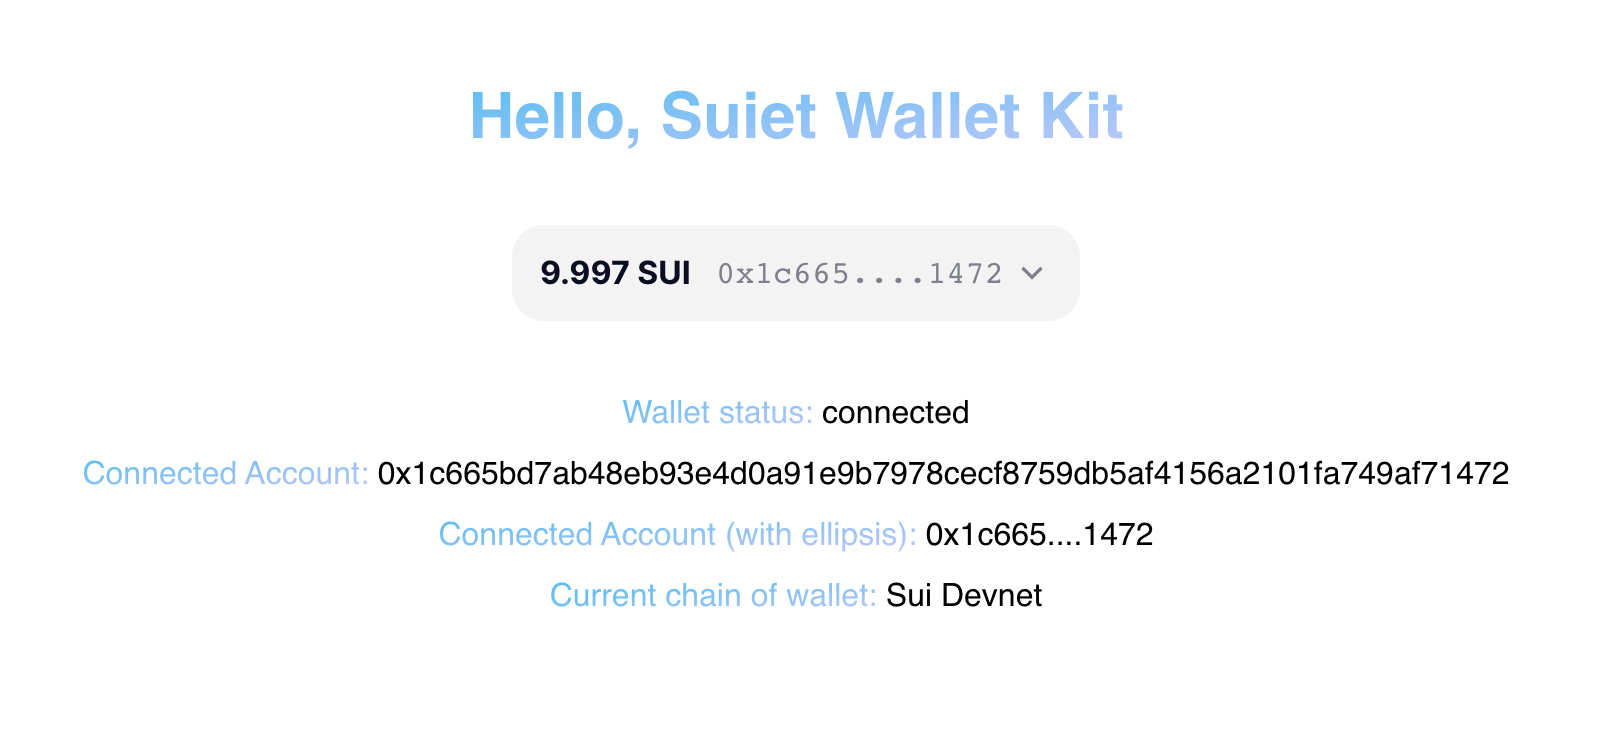
There you go! So far you should be able to play with the all the properties provided by the hook useWallet. The full version of demo code can be found in the below codesandbox (filename: 01-useWallet.js).
For more API references, please check out the documentation: https://kit.suiet.app/docs/Hooks/useWallet#api-references.

Execute a simple transaction
Now we've come to the most interesting part: sending transactions. With Sui SDK @mysten/sui, we are able to use Programmable Transaction, one of Sui’s most powerful core developer primitives, to create any type of transactions to interact with smart contracts on Sui.
For more details of Programmable Transaction, please check out this Sui doc: https://docs.sui.io/testnet/build/prog-trans-ts-sdk.
Again let's try this with a simple transaction, minting an NFT of Suiet Logo.

Here is a smart contract for creating an NFT with custom name, description and img url, you can find the contract on Sui explorer (devnet)
module e146dbd6d33d7227700328a9421c58ed34546f998acdc42a1d05b4818b49faa2.nft {
// ...

// Arg0: String - nft name
// Arg1: String - nft description
// Arg2: String - nft img url
entry public mint(Arg0: String, Arg1: String, Arg2: String, Arg3: &mut TxContext) {
//...
}
}
In order to call the mint function of this contract, we first create a function that returns a TransactionBlock using Sui TS SDK.
import { Transaction } from "@mysten/sui";

function createMintNftTxnBlock() {
  // define a programmable transaction block
  const txb = new Transaction();

  // note that this is a devnet contract address
  const contractAddress =
    "0xe146dbd6d33d7227700328a9421c58ed34546f998acdc42a1d05b4818b49faa2";
  const contractModule = "nft";
  const contractMethod = "mint";

  const nftName = "Suiet NFT";
  const nftDescription = "Hello, Suiet NFT";
  const nftImgUrl =
    "https://xc6fbqjny4wfkgukliockypoutzhcqwjmlw2gigombpp2ynufaxa.arweave.net/uLxQwS3HLFUailocJWHupPJxQsli7aMgzmBe_WG0KC4";

  txb.moveCall({
    target: `${contractAddress}::${contractModule}::${contractMethod}`,
    arguments: [
      tx.pure(nftName),
      tx.pure(nftDescription),
      tx.pure(nftImgUrl),
    ],
  });

  return txb;
}
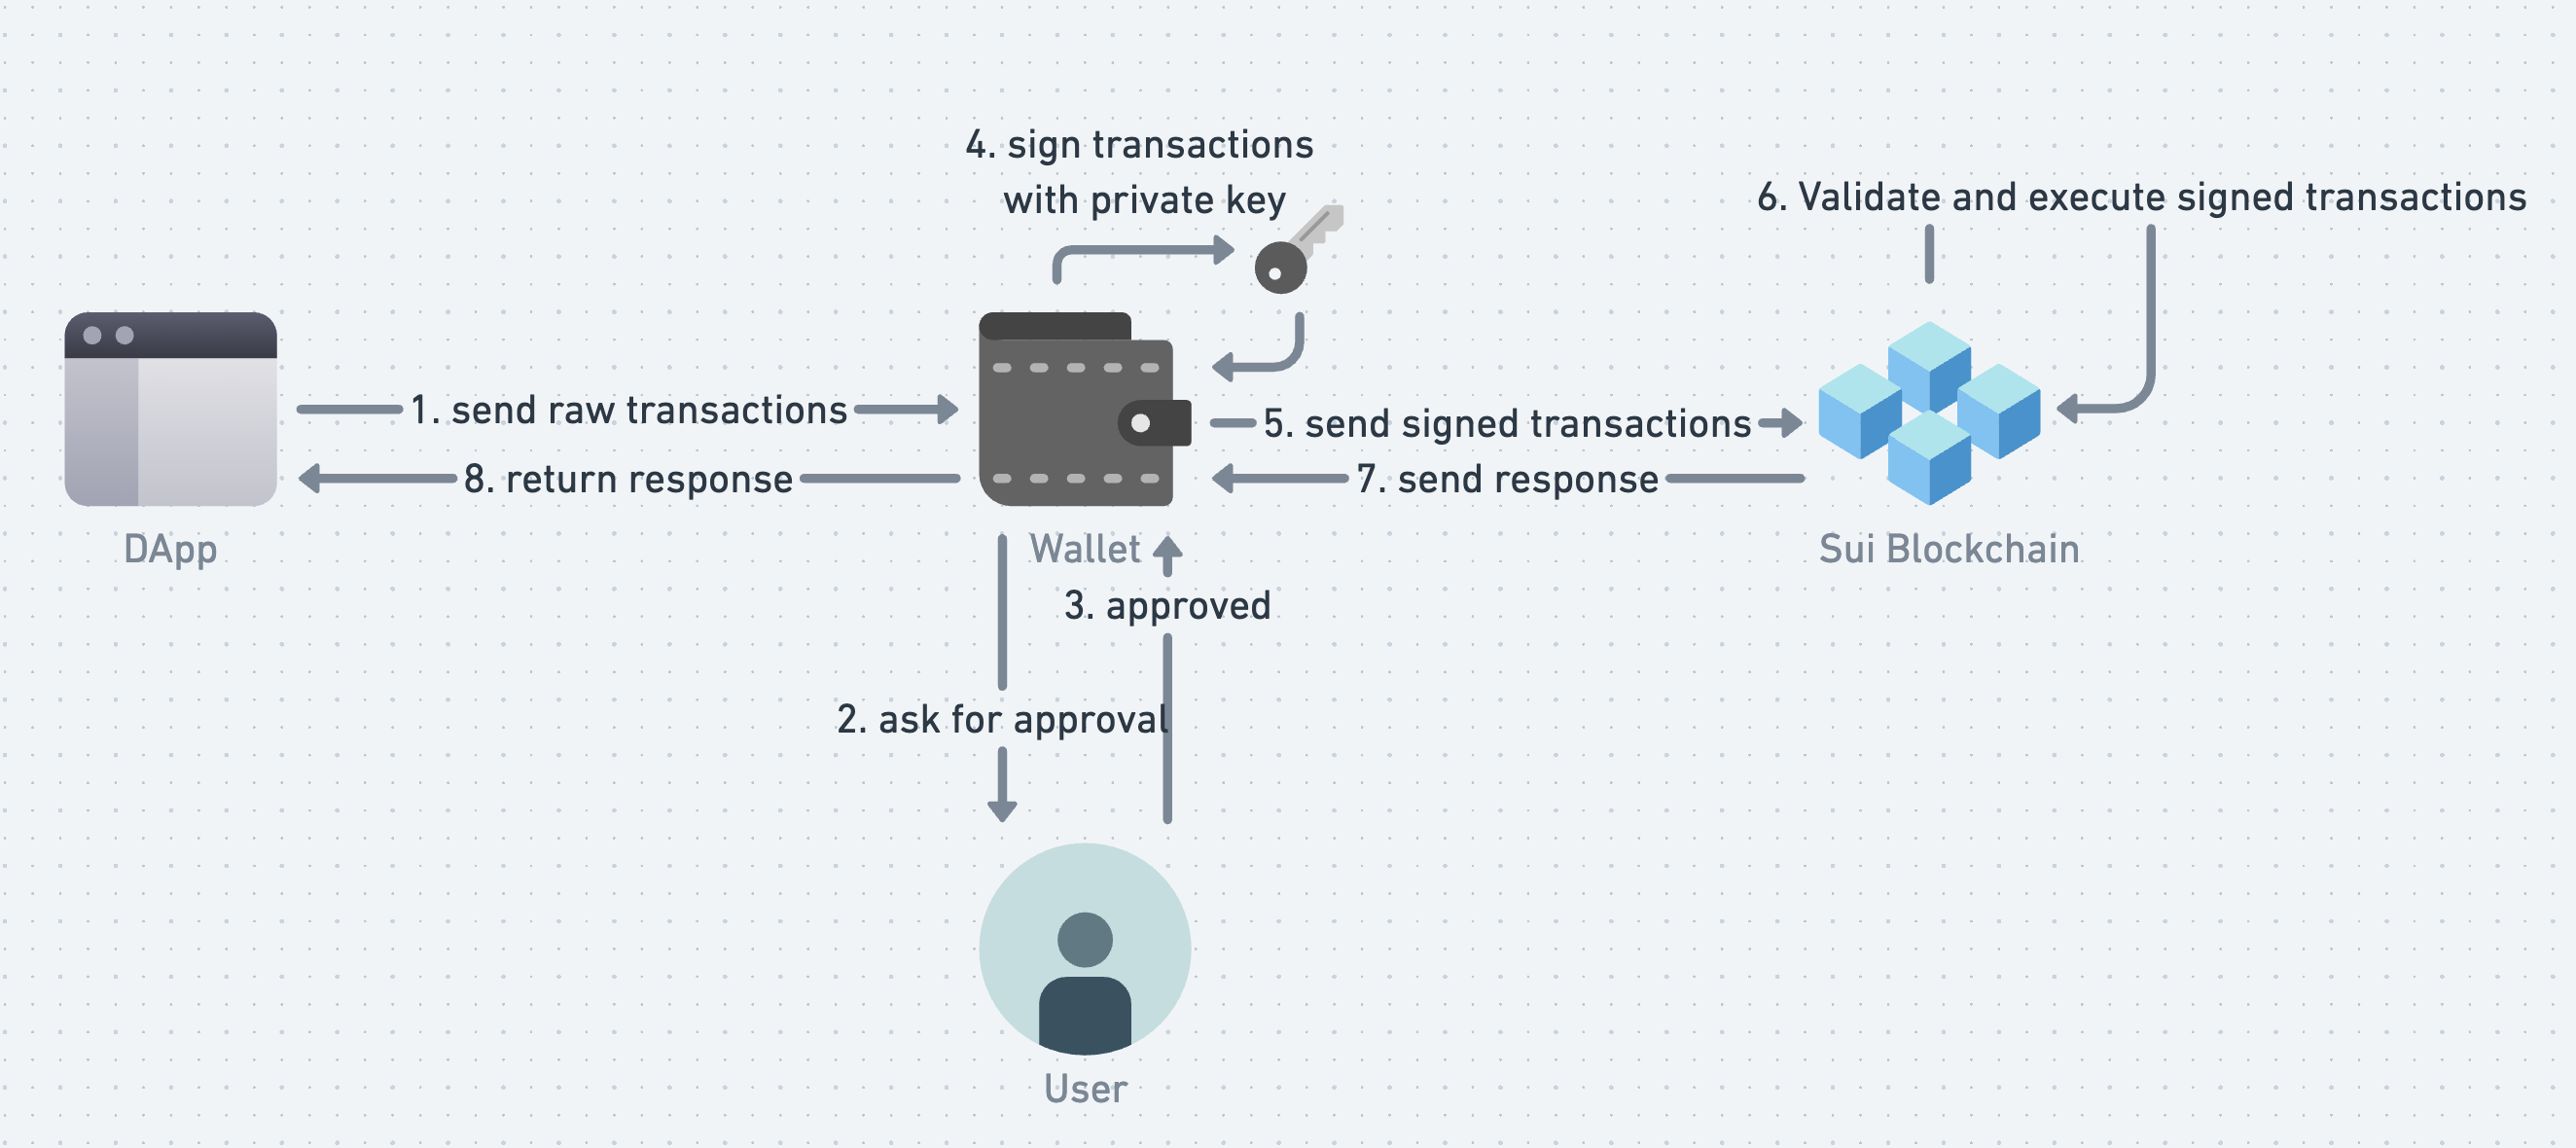
We've defined the smart contract target as well as the arguments, now it's time to create the transaction block and execute it. For clear explanation, I drew a diagram for showing the interaction process.
Okay, get back to the code. Let's create an async function that creates and sends the transaction to the wallet for signing and execution.
import { useWallet } from "@suiet/wallet-kit";
import { Transaction } from "@mysten/sui";

function createMintNftTxnBlock() {
  // ...
}

export default function App() {
  const wallet = useWallet();

  async function mintNft() {
    if (!wallet.connected) return;

    const txb = createMintNftTxnBlock();
    try {
      // call the wallet to sign and execute the transaction
      const res = await wallet.signAndExecuteTransactionBlock({
        transactionBlock: txb,
      });
      console.log("nft minted successfully!", res);
      alert("Congrats! your nft is minted!");
    } catch (e) {
      alert("Oops, nft minting failed");
      console.error("nft mint failed", e);
    }
  }

  return (
    <div className="App">
      {/* ... */}
      {wallet.status === "connected" && (
        <button onClick={mintNft}>Mint Your NFT !</button>
      )}
      {/* ... */}
    </div>
  );
}
We've placed a button on the page which triggers the mintNft function, where it calls wallet.signAndExecuteTransactionBlock to invoke the connected wallet to sign and execute the transaction request.
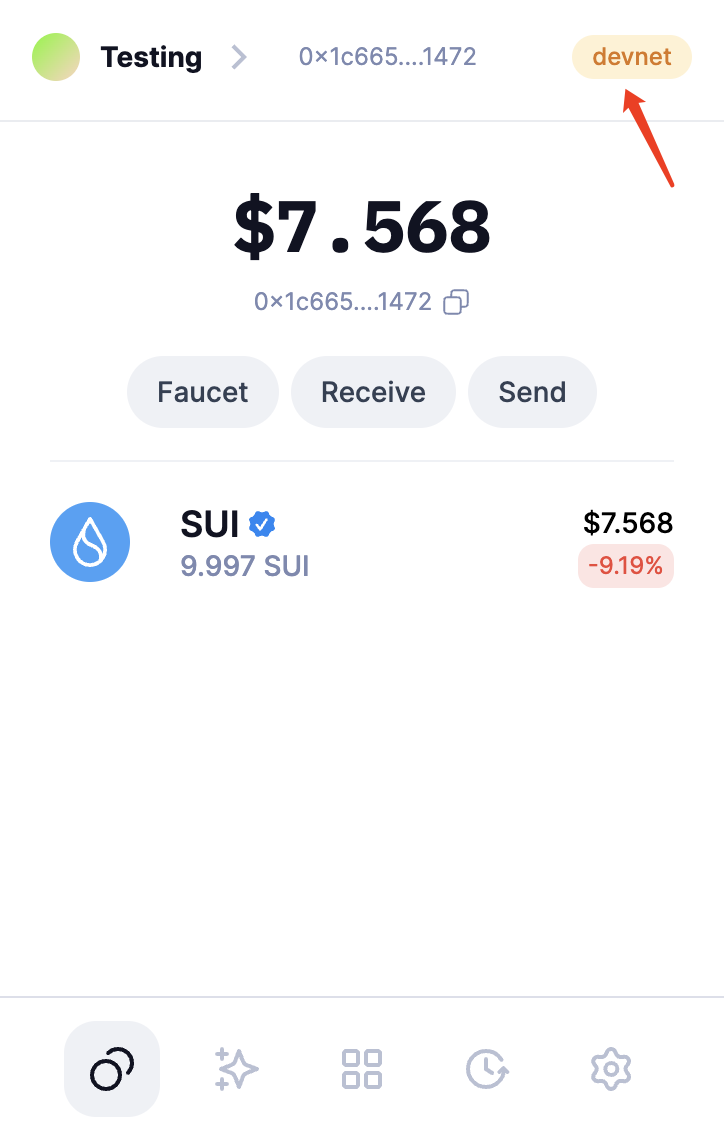
Finally, let's take Suiet wallet for testing. First open your Suiet Wallet, change the network to devnet.
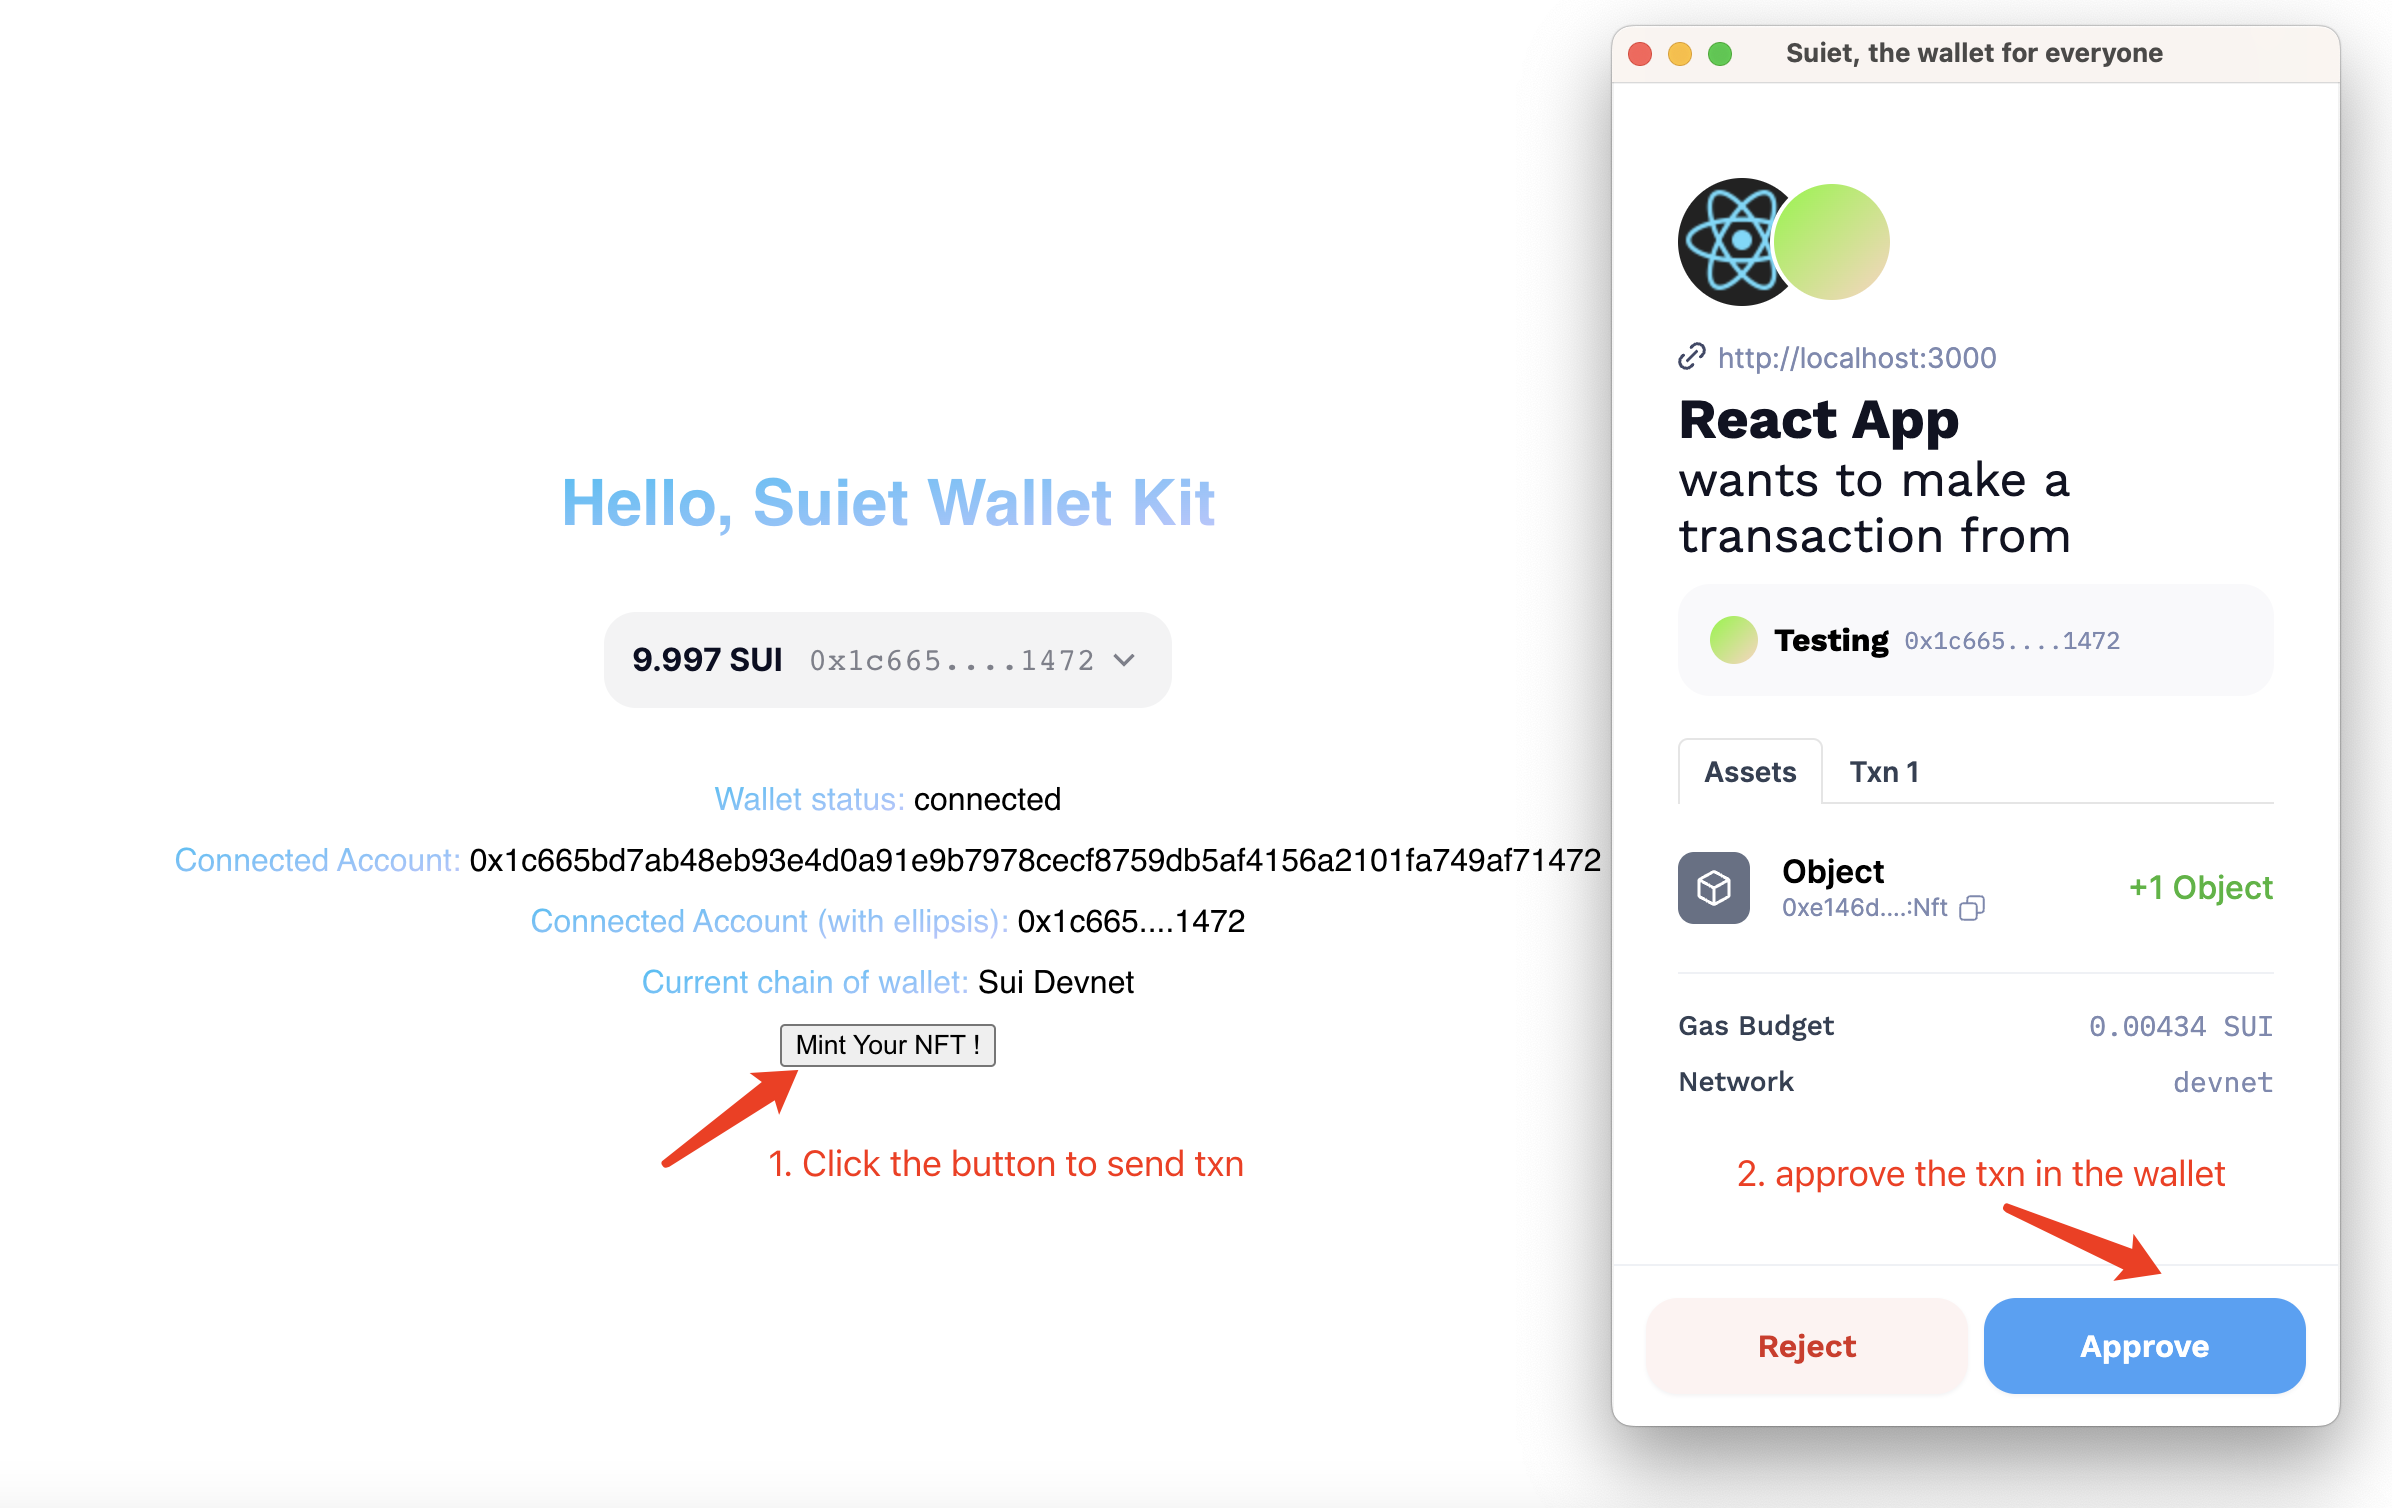
Then click the button "Mint Your NFT!" to send the transaction to the wallet:
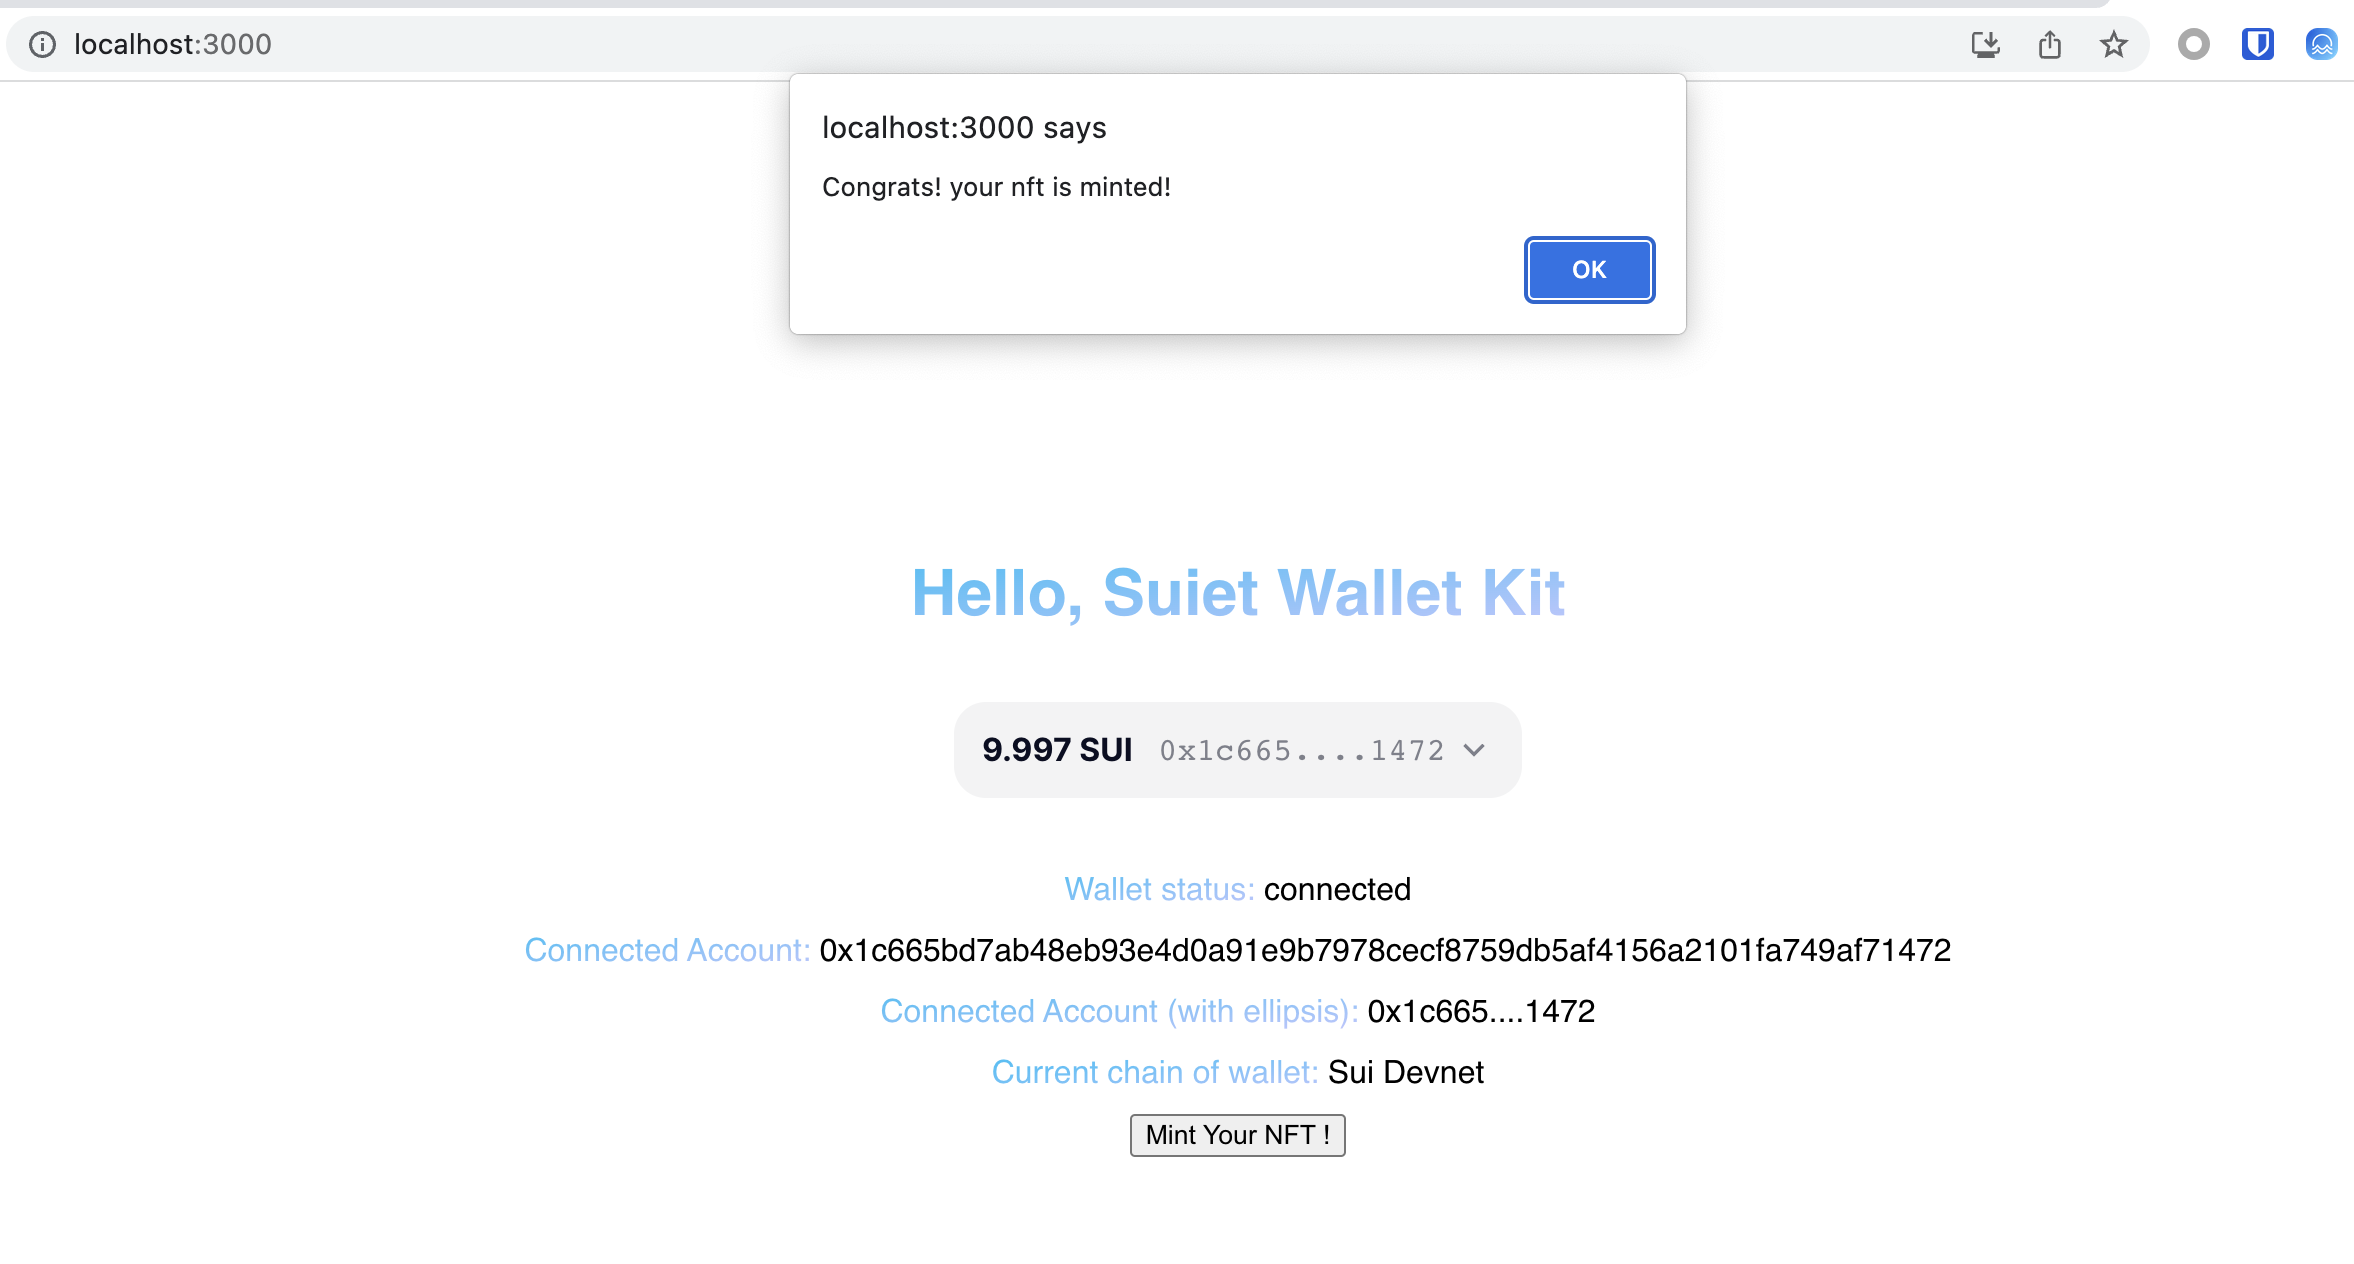
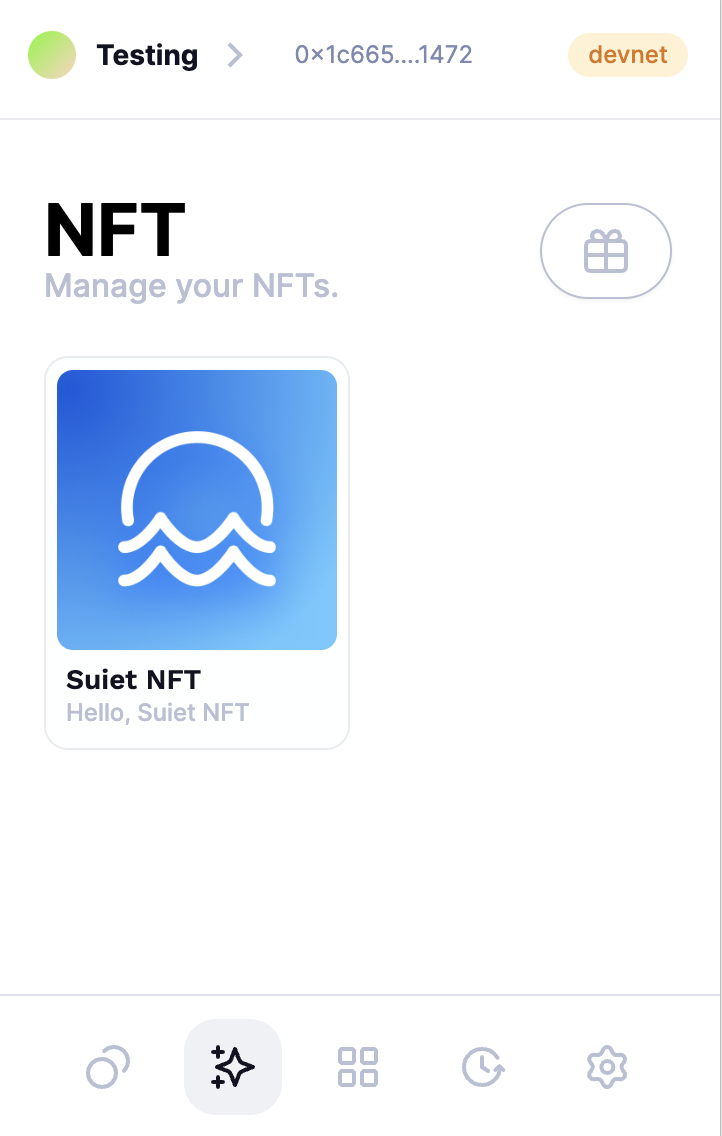
If everything works, you should see a popup saying "your nft is minted!". Now check the NFT section in your Suiet wallet, you should see a beautiful Suiet NFT there.
If you made this far, then congratulations! Your dapp is equipped with the power to interact with wallets and users. Don't hesitate, go and keep on making your dapp more interesting and powerful!
What's more
In fact, with Suiet wallet kit, connecting to wallets is just a simple step. I would like to provide a list of topics that you might explore more:
- Tutorials
- Hooks
- Styling
- Configuration and types
The End
In this tutorial, we introduce how to install and make use of Suiet wallet kit to empower your DApp with the ability to connect to all the wallets on Sui and use wallet's capabilities such as fetching user account's info and sign and executing a transaction block.
Remember this is just an entry-level tutorial. With the programmable transaction feature, you should be able to implement many different interesting functions on your DApp in a blockchain-native way.
If you have any confusion while using Suiet wallet kit, please check out the docs of Suiet wallet kit.
If you find any issues or bugs, welcome to submit issues or PRs to the Github repo. Let's make Sui and open-source community better together!